
I’ve been bullish on nostr for a while now, but even I am surprised by how swift the ecosystem around this open protocol has been growing. Yes, it’s still early days. But it’s the perfect time to poke around and break build things. How else would you explore and learn?
So, after porting my two bots to nostr, I thought why not write a little guide that helps to spark the bot revolution shows how the sausage is made.
While there is a little bit of plumbing involved, creating a bot that does nothing but post stuff is incredibly straightforward. And best of all, we don’t even have to write a single line of code!
Alright, let’s break it down.
- The goal: build a bot that says “gm” every morning.
- The approach: run noscl in a cron job that’s set to 6:15 am
That’s it. Simple.
If you have a linux system running somewhere and know your way around the command line you’re basically done already. If you are a normal person and don’t have that, read on.
We’ll use Ubuntu Server, as it is widely available.
7 steps to gm:
- 1) Create dedicated bot user
- 2) Roleplay as the bot and install go
- 3) Set go path
- 4) Install noscl
- 5) Create the bot
- 6) Say “Good morning!”
- 7) Automate with crontab
1) Create dedicated bot user
We will create a dedicated user on our system that does nothing but post “gm” to nostr. Let’s call him “gmbot”.
sudo useradd -d /home/gmbot -m gmbot
I’ll let you pick the password.
sudo passwd gmbot
We’ll also add this user to the sudoers group:
sudo usermod -aG sudo gmbot
Great, done. On to using the user!
2) Roleplay as the bot and install go
Let’s drive stick shift before we switch to automatic. Switch to the gmbot user:
su gmbot
The nostr client we’re going to use is written in go, which is why we need to install go:
sudo snap install go --classic
If you want to avoid snap, you can also install go from source or via a custom PPA.
Whatever installation method you use, make sure that go works:
go version
If you see an output that says go version go1.19.5 linux/amd64 (or something along these lines) we can move on to the next step. Paths!
3) Set go path
Edit your .bashrc with the editor of your choice…
vim ~/.bashrc
…and set the go path by adding the following at the end of the file:
# Set go path to user's home directly
export GOPATH=$HOME/go
export PATH=$PATH:$GOROOT/bin:$GOPATH/bin
Save, exit, and load it up:
source ~/.bashrc
4) Install noscl
As mentioned before, we’re going to use fiatjaf’s noscl client to post notes and other stuff. Install the latest version via go install:
go install github.com/fiatjaf/noscl@latest
This will install noscl for your “gmbot” user, as we’ve set the install path to the user’s home directory. Neat!
Now try it!
noscl
Here’s what it will spit out:
> can’t open config file /home/gmbot/.config/nostr/config.json:
> open /home/gmbot/.config/nostr/config.json: no such file or directory
Uh-oh, that’s not good.
The config directory does not exist, so noscl can’t create the config file it needs. Creating the directory fixes this!
mkdir -p ~/.config/nostr
Now noscl should work. Run it again…
noscl
…and you should see a “usage” text as follows:
Usage:
  noscl home
  noscl setprivate <key>
  noscl sign <event-json>
  noscl verify <event-json>
 ...
We’re going to do a noscl setprivate next, which will put the private key of our bot into the config file, effectively creating the bot account on the nostr protocol. (Side note: if an account is created in the woods, but never publishes a note, does it even exist?)
5) Create the bot
Every nostr account needs a private key. No key, no message signing, no posting “good morning.” Simple as that.
You can create the keys of your bot by rolling some dice. Don’t have any dice handy? Well, that sucks.
Luckily, noscl can generate keys too. So let’s use that to generate the private key for your bot.
noscl key-gen
It will produce an output like this:
> seed: armed birth test cargo ... orchard autumn
> private key: fc4b95d1....c5b98bd
Copy-paste the private key and set it via noscl setprivate. Unless you hate yourself. If you hate yourself, type it in by hand.
noscl setprivate <KEY_GENERATED_ABOVE>
You’ll have to use your actual private key, not <KEY_GENERATED_ABOVE>. Easy mistake to make! Also make sure to keep your bot’s private key private. “Not your keys, not your notes” and all that.
6) Say “Good morning!”
Let’s pretend it’s 6:15 am. Time to say “good morning.”
You could try to scream “good morning” into the void, but noscl will scream right back at you, telling you that you have zero relays set up. No relays, no party. We need to add at least one relay to talk to the nostrverse, so let’s add everyone’s favorite relay: your mom.
noscl relay add wss://nostr.mom
If successful, you’ll see something like:
> Added relay wss://nostr.mom.
You don’t have to use this exact relay, and you’re free to add multiple relays. Consult nostr.watch for a list of public relays.
Time to publish our first “good morning!”
noscl publish "Good morning!"
Ta-daa! Your bot is alive! You should see something like this:
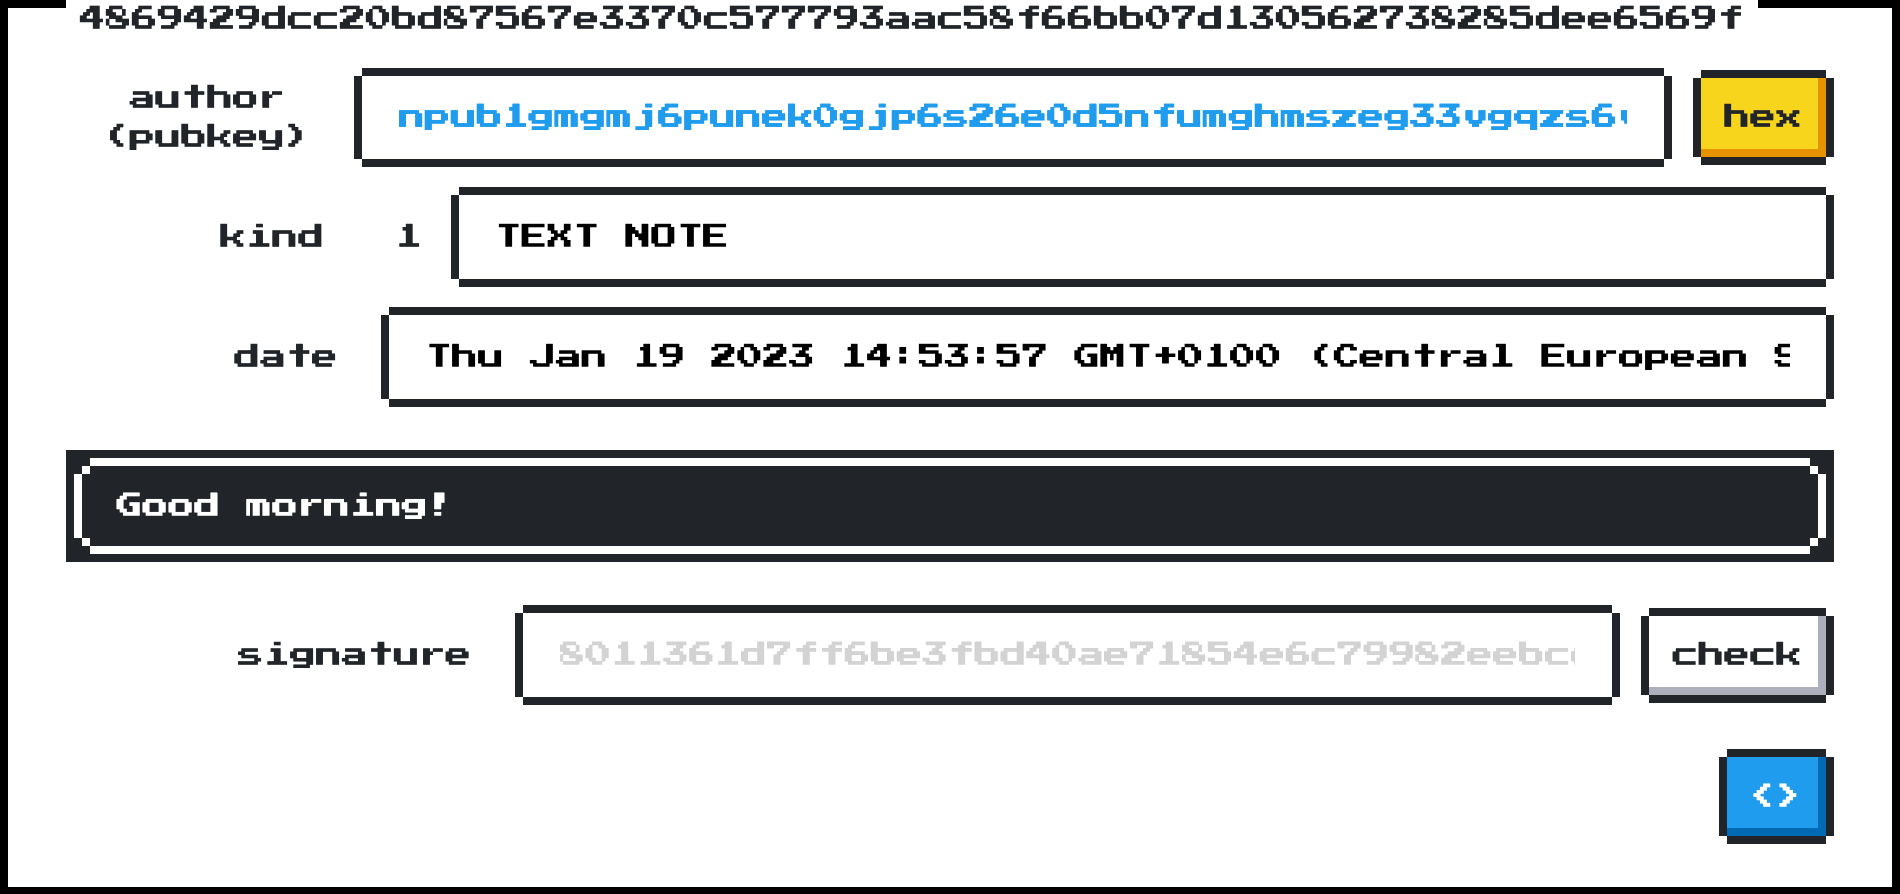
> Sent event 4869429dcc20bd87567e3370c577793aac58f66bb07d130562738285dee6569f to 'wss://nostr.mom'.
You can use a “nostr explorer” like nostr.guru to look up the event, i.e. the note you just published. It might take a minute to show up, but if everything worked, you should see it staring back at you:
7) Automate with crontab
Still logged in as the gmbot user, edit the user-level crontab with
crontab -e
…and add the following line at the end of the file:1
15 6 * * * /home/gmbot/go/bin/noscl publish "Good morning!"
Save the file & exit, and crontab should tell you that it is installing a new crontab. Very kind of crontab, but also very redundant.
> crontab: installing new crontab
That’s it!
Now every morning—as long as the server that you used to set all this up is running—the bot you created will great the world with a censorship-resistant “Good morning!”
You can use the private key of your bot to update the profile metadata, i.e. set a name, description, profile picture, banner, and so on. You can even give your bot a lightning address, just like I did!
If you found this little tutorial valuable, feel free to give value back by throwing some sats at the bot: ⚡gmbot@ts.dergigi.com
Follow the bot on nostr:
npub1gmgmj6punek0gjp6s26e0d5nfumghmszeg33vgqzs6vhn0x0vq3q5mdaxm
As always, feel free to remix, improve, and translate this guide. It is published under a permissive license, as is all my other stuff.
GM 🌅🤙
If you’re having trouble making sense of the crontab syntax, crontab.guru is a useful tool. ↩
💜
Found this valuable? Don't have sats to spare? Consider sharing it, translating it, or remixing it.Confused? Learn more about the V4V concept.